
As your organization grows, you may find that you need to add new entities in your Sage Intacct environment. Sage Intacct provides robust multi-entity accounting software tools to help manage multiple locations or businesses from one platform. While the process to create a new entity record is simple and quick, there are associated system objects, processes, and functional areas of the system that a company may need to update as users begin transacting for the new entity. This article will describe common lists, workflows, and configuration settings to review and make changes, if applicable, when adding a new entity in Sage Intacct.
What Is Multi-Entity Accounting?
Multi-entity organizations often face challenges when consolidating financial data due to each entity maintaining its own chart of accounts. To address these challenges, multi-entity accounting software can provide consolidated, real-time information. Organizations that streamline multi-entity consolidations can move away from manual, error-prone spreadsheets and fragmented data.
Multi-entity accounting is the practice of managing, recording, and reporting the financial activities of multiple distinct entities within a larger organization. These entities can include subsidiaries, divisions, or locations. Despite being legally separate, they typically are controlled by a single parent company.
This approach can help organizations that operate in various regions or markets adhere to different local regulations and tax requirements. Multi-entity accounting helps consolidate financial data from these diverse entities, providing an inclusive view of the organization’s overall financial health.
Adding a New Entity in Sage Intacct
Step 1: Verify the new entity is included in your current Sage Intacct contract.
If you have the Multiple Entity Package (MEP) in your contract and will have less than 1,000 entities in the system, there is no additional cost to add a new entity. If you do not have MEP in your contract, then review the contract details to understand the number of single entities you purchased. If you need to add an entity that would bring the count higher than the level you’ve purchased, please contact your Sage Intacct Partner ([email protected]) for help with placing the order.
Step 2: Create the new entity.
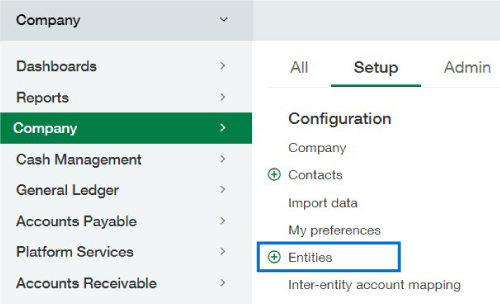
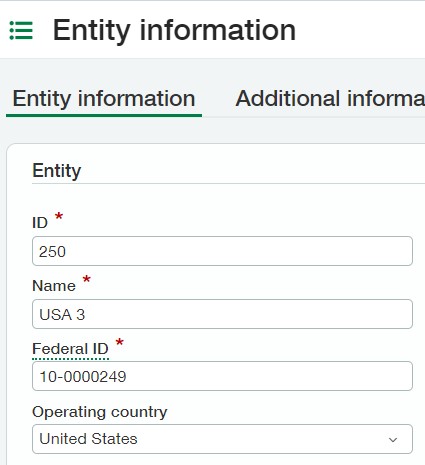
Create a new unique Entity ID with a Federal ID number for 1099s. Add this at the Top Level at Company > Setup > Entities > Add. Currency also will be required if you utilize multi-currency functionality. Save and refresh your browser to update all lists in the system.
Step 3: Create new checking, savings, and credit card accounts for the new entity … and more!
New bank accounts can be added at Cash Management > All or Setup > Accounts. When adding new bank accounts, new General Ledger (GL) accounts will also be required as the system involves a one-to-one relationship for each. A new credit card account will require a new, unique vendor in addition to the new GL account.
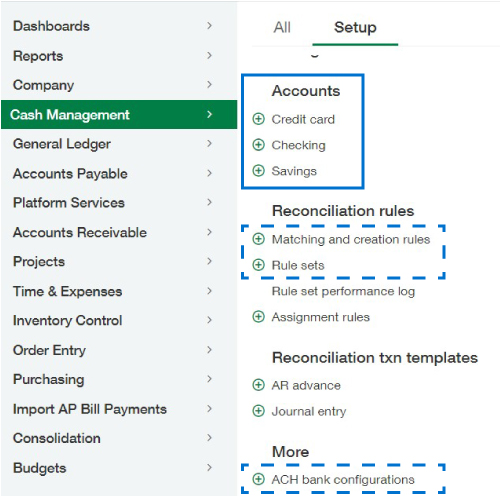
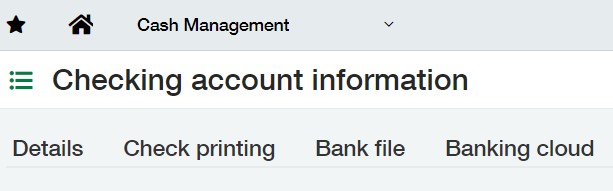
For checking accounts, set up the check printing configurations on the accounts if you plan to print checks out of Sage Intacct. ACH bank configurations also can be created on the Setup menu of Cash Management and then associated with the bank account on the “Bank File” tab, where applicable.
Connect bank or credit card feeds for new accounts on the “Banking Cloud” tab of the account record.
For efficient bank reconciliation functionality, be sure to add the new accounts to the Matching Rule Sets found on the Setup menu of the Cash Management module. A thorough review of existing Matching and Creation rules also is a good step to complete as you may find that new creation rules are needed for the new entity’s activity.
If you enter and process transactions at the Entity Level and have set up default bank accounts, navigate to the new Entity Level and add the default accounts in the Cash Management, Accounts Receivable, and Accounts Payable configuration pages.
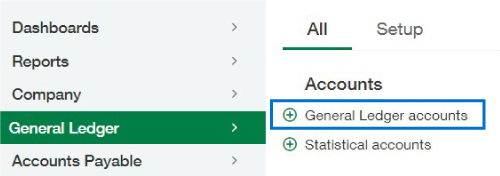
Step 4: Add GL accounts for Inter-Entity Receivable and Payable functionality.
New GL accounts can be added at General Ledger > All > Accounts > General Ledger accounts. Remember to include any Dimension requirements for posting when setting up new accounts.
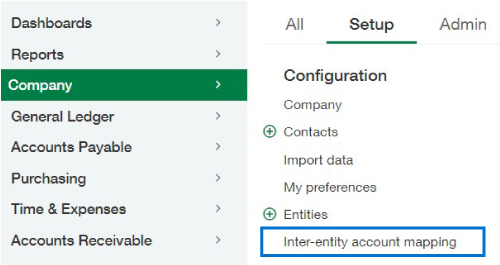
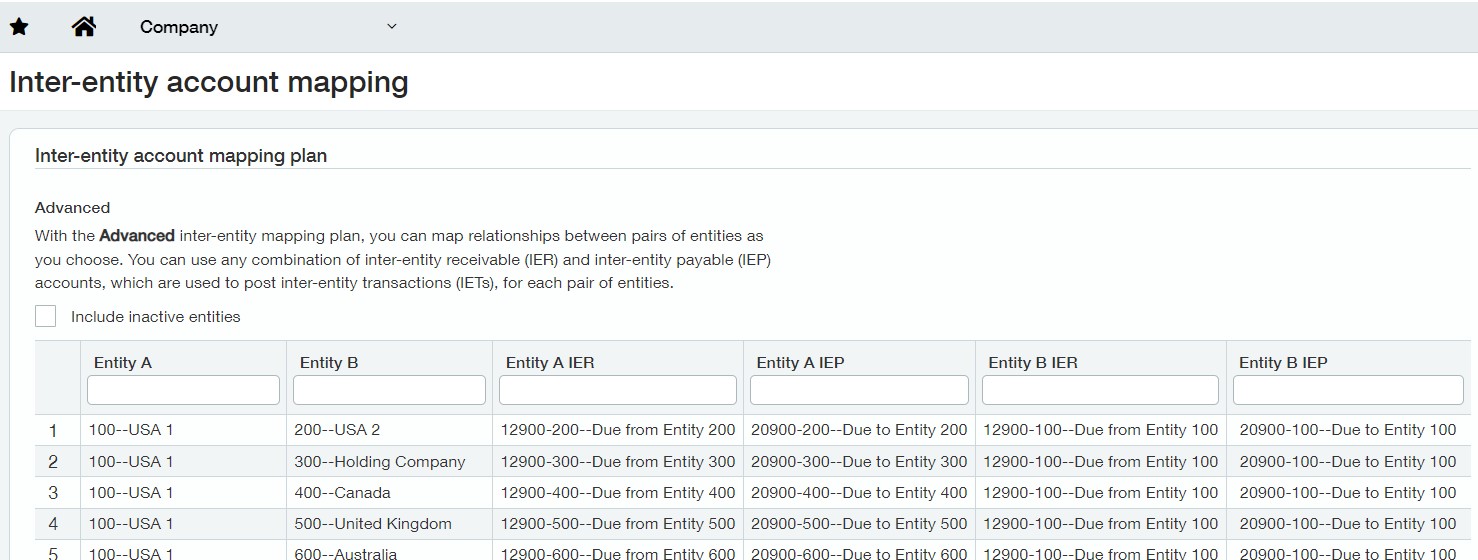
Step 5: Update the Inter-Entity mapping plan for all relationships needed with the new entity and existing entities.
Now that GL accounts are set up for Inter-Entity transactions between existing and new entities, add all necessary relationships to the mapping plan at Company > Setup > Configuration > Inter-entity account mapping. You may use the Intacct import template to populate and load the new relationships or edit the plan and manually add new relationships in the table for either the Basic or Advanced plan you previously established.
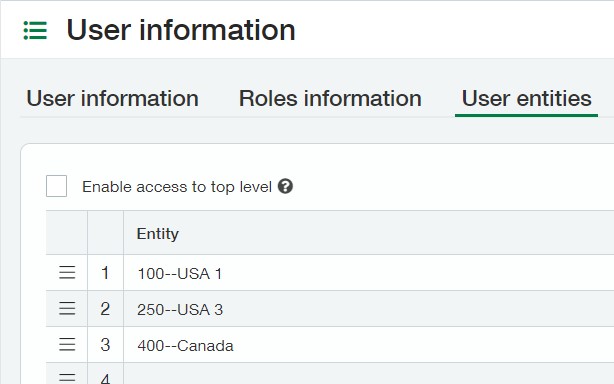
Step 6: Create new users and roles, as needed, for the new entity. Also, update any users’ entity restrictions and/or approval workflows.
Add any new users and roles for the entity at the Company > Admin > Users, roles, and groups menu. If users are set up with entity restrictions, review and update the users as needed to provide access to the newly created entity. If any restricted users also perform bank reconciliations, then the bank account restrictions in Cash Management should be updated as well. Remember to add new users to groups, where applicable.
If any new users will be responsible for approvals in the system, review and update the following:
- General Ledger > Setup > Configuration > Approval options (for Journal Entries)
- Accounts Payable > Setup > Configuration > Vendor, AP Bill, and Payment approvals
- Purchasing > Setup > More> Approval policies
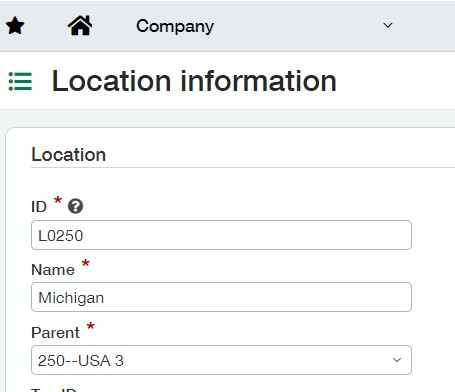
Step 7: Add or import any new locations, warehouses, or other dimension values in the new entity.
When a new entity is created via step two above, all current master data lists of GL accounts, departments, customers, vendors, classes, items, projects, employees, and any user-defined dimensions are immediately available to use in coding transactions for the new entity. The data lists may need to be updated with new records that should be available for the new company’s business processes and reporting.
Existing location dimension values are already assigned an existing Entity Parent. New locations may need to be created as “children” of the new entity.
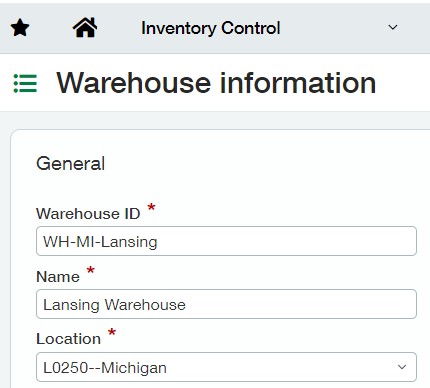
For companies subscribed to the Inventory Control module, existing warehouses are already assigned an existing entity or location value. New warehouses may also need to be created and assigned to the new entity or its new location “children.”
New dimension values can be added manually by users with permissions or by using the CSV import templates provided at Company > Setup > Configuration > Import data.
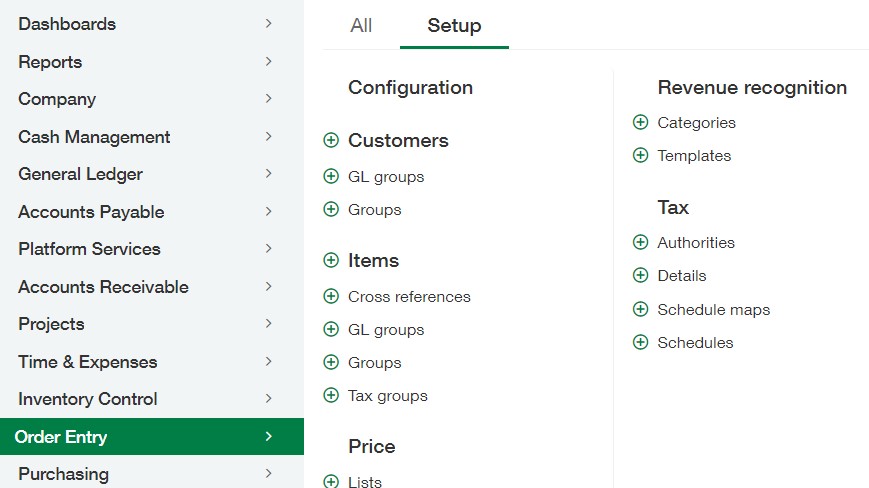
Step 8: For companies using Advanced Tax functionality, add new Tax Details, Tax Schedules, and Schedule Maps for new jurisdictions where the entity conducts business activities.
The addition of a new entity may bring your business activities into new geographic areas that have taxation requirements in jurisdictions not yet set up in Sage Intacct. Complete a review of your Tax Details, Tax Schedules, and Schedule Maps to decide if new taxes in more jurisdictions need to be created to adequately capture and compute taxes on your transactions.
New components for Advanced Tax functionality can be created in Order Entry, Accounts Receivable, and/or Purchasing applications depending on your business processes. For any new Tax Authorities, you also will need to create new vendors in either Accounts Payable or Purchasing if they were not already added as part of step seven. The Order Entry > Setup > Tax menu is shown below.
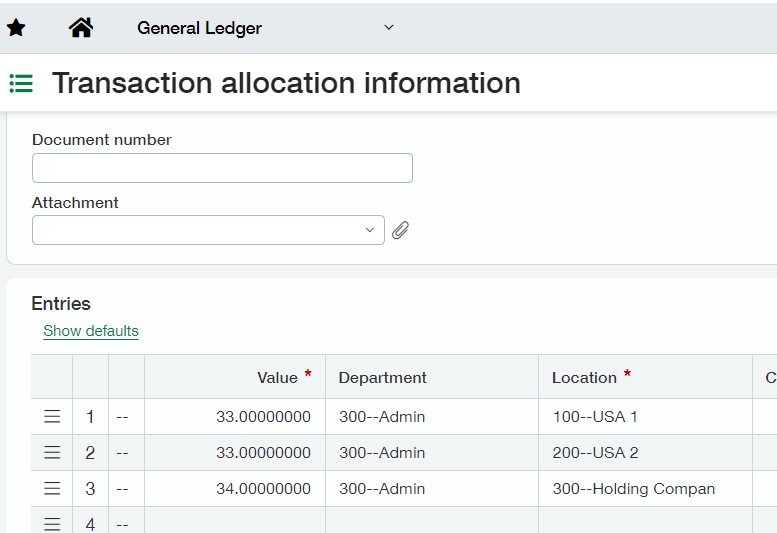
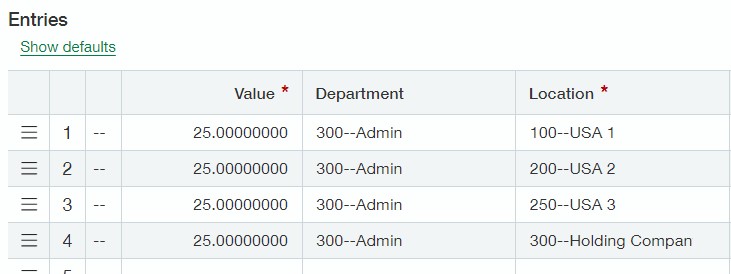
Step 9: Update Transaction and Dynamic Allocations, as needed, to distribute costs to the new entity.
If your company uses standard Transaction Allocations to distribute costs on a fixed or percentage basis to multiple entities, locations, or other dimensions, then allocations will need to be updated (or created) to capture distributions necessary for posting to the new entity and/or new dimensions created for the new entity (in step seven). Changes can be made at General Ledger > Setup > Transaction allocations.
Example allocation before adding a new entity:
Update made to include the new entity in the allocation:
If your company subscribes to the Dynamic Allocations add-on, also found on the General Ledger > Setup menu, then modifications or new allocations may be needed so that the Account Allocation Definitions appropriately include the new entity.
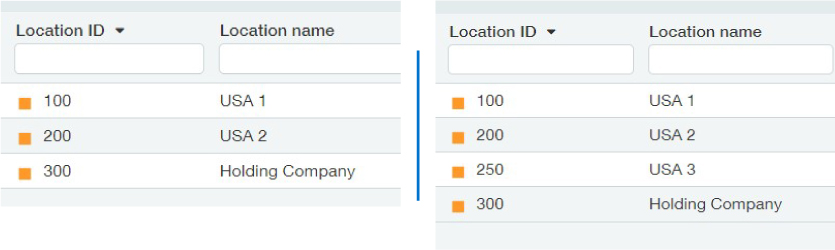
Step 10: Modify any Location Groups for financial reporting that should include the new entity.
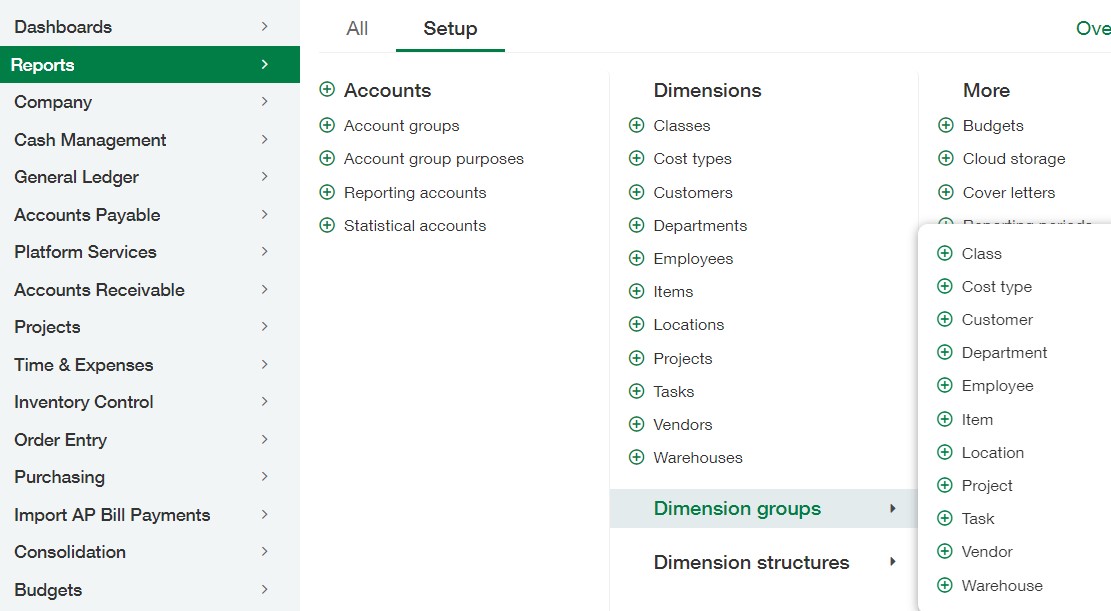
Location Groups are a great way to efficiently report on multiple entities and/or locations within financial reports. They also can be used to filter the results of any standard Application report, such as General Ledger Detail or Customer Aging. If your company uses Location Groups in Sage Intacct, review the list at Reports > Setup > Dimension groups and make any necessary updates to include the new entity.
Example: Location Group “USA – All Locations” before and after adding new Entity:
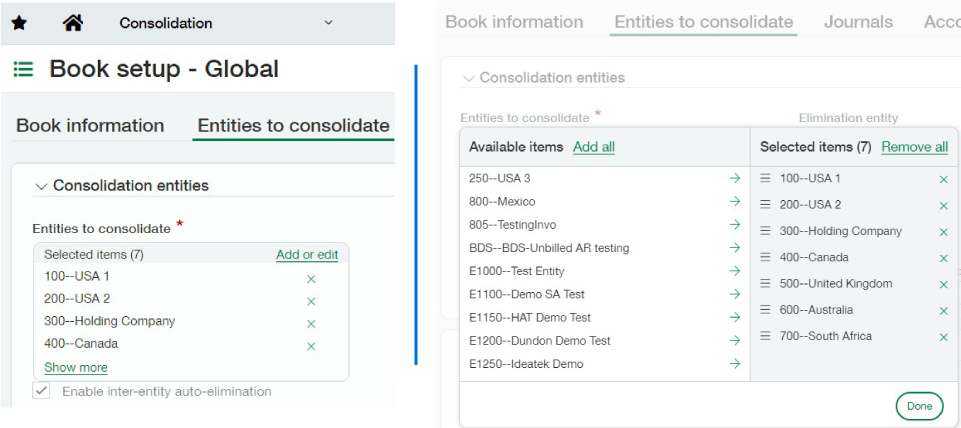
Step 11: For companies subscribed to Domestic or Global Consolidations, edit Consolidation Books to include the new entity.
If you subscribe to Domestic or Global Consolidations, review the Consolidation Books and make updates where needed to include the new entity in the configuration on the “Entities to consolidate” tab of the Book.
Step 12: Review Purchasing, Order Entry, and Inventory workflows to determine if new transactions are required for the new entity.
Within the Purchasing, Order Entry, and Inventory applications, navigate to Setup > More > Transaction Definitions on the menus to review the list of transactions available in your current workflows. Does the new entity require tracking for commitments in Purchasing? Is a Drop Ship or Buy to Order workflow needed for a customer relationship in the new entity? Will replenishment need to be enabled for inventory items in the new business? Evaluate current workflows to determine if new Transaction Definitions should be added or if configuration settings should be updated to turn on functionality that your company did not previously use.
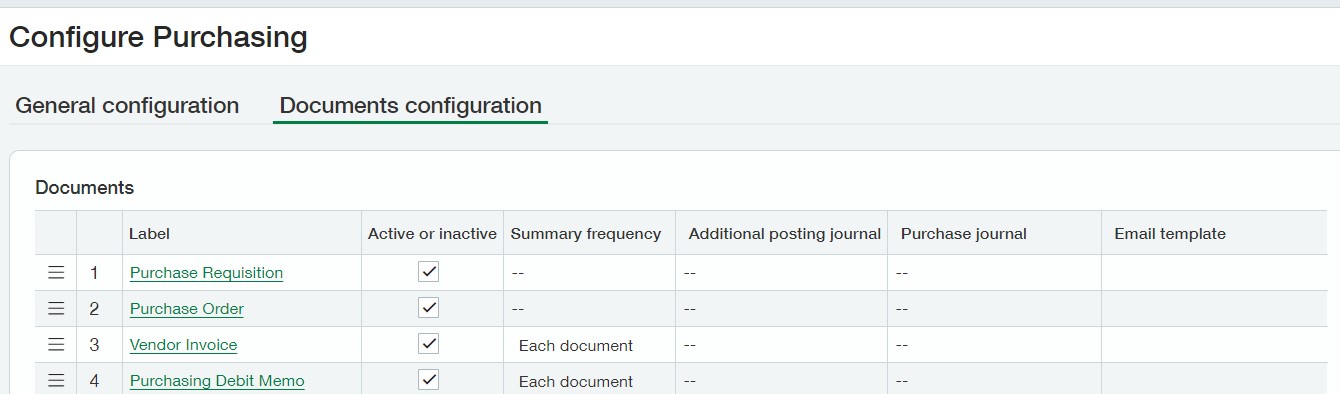
If you add new transactions, remember to update the sort order of transactions on the application menus at Purchasing or Order Entry or Inventory > Setup > Configuration > Documents configuration tab.
If new document sequences are needed, add them at Company > Setup > Settings > Document sequences.
Step 13: Create new printed document templates, as needed, with the new entity’s logo.
You may generate and send invoices to customers and purchase orders to vendors that are customized and contain the company logo. The addition of a new entity with a new logo may require a new set of document templates with a different logo and format. You may have added new transactions in step 12 that need corresponding templates. Access your customized documents at Platform Services or Customizations > All > Printed doc templates.
Find a customized document in the list by name, application, or template type, and select the Template link to download the file. Make the necessary changes and then create a new template name with the new file. Document templates for different entities are assigned as follows:
- Setup > More > Transaction Definitions > Entity settings tab for Purchasing and Order Entry. (The default doc templates functionality assigned on this tab is for use when navigating to the Entity Level and generating the transactions. If your company does not transact at the Entity Level, then you have the option to set default doc templates on the customer or vendor record or select a template name to override the default when using print or email from Accounts Receivable, Order Entry, or Purchasing application menus.)
- Setup > Configuration > Formatting for Accounts Receivable

Step 14: Create new email templates, as needed, with updated wording and logo of the new entity.
You may send customized emails with document attachments directly to customers and vendors that contain your company logo. The addition of a new entity with a new logo may require a new set of email templates with a different logo and wording in the body of the email. Access email templates at Company > Setup > Settings > Email templates.
Find your customized template in the list and select “View.” Duplicate the template, enter a new name, and make any wording or logo changes. Email templates for different entities are assigned as follows:
- Setup > Configuration > Documents configuration tab for Purchasing and Order Entry
- Setup > Configuration > Formatting for Accounts Receivable
Step 15: Update any third-party integration settings or API calls for data that will sync to/from the new entity.
If you have integrations with Sage Intacct Marketplace Partners or other third parties that connect to Sage Intacct’s open API, review the connections for any modifications that may be necessary for the new entity. To identify active integrations, review the following areas of Sage Intacct:
- Company > Admin > Usage metrics > API usage
- Company > Setup > Configuration > Company > Security tab: Review “Web Services authorizations”
- Company > Admin > Users, roles, and groups > Web Services users
Conclusion
In addition to the common functionality described above, there may be other areas of the system that require updates when adding a new entity in Sage Intacct. These may include, but are not limited to, Price Lists, Contracts module, Projects or Grants Tracking and Billing module, Revenue Recognition templates, Spend Management validation settings, Time & Expense module, Prepaids, or Fixed Assets.
The functionality and applications mentioned in this article are not a comprehensive list of settings that may require changes for a new entity in Sage Intacct. Each organization has varying business processes that should be fully evaluated by management and system administrators so necessary updates are made to accommodate a new entity.
By following these steps and best practices, you can maintain robust, efficient multi-entity accounting within Sage Intacct. Business Technology Services at Forvis Mazars provides technology assessments of your system to help ascertain the best practices for adding a new entity. If you have questions about these steps, please contact your Sage Intacct Partner or send a message to [email protected] for further assistance.