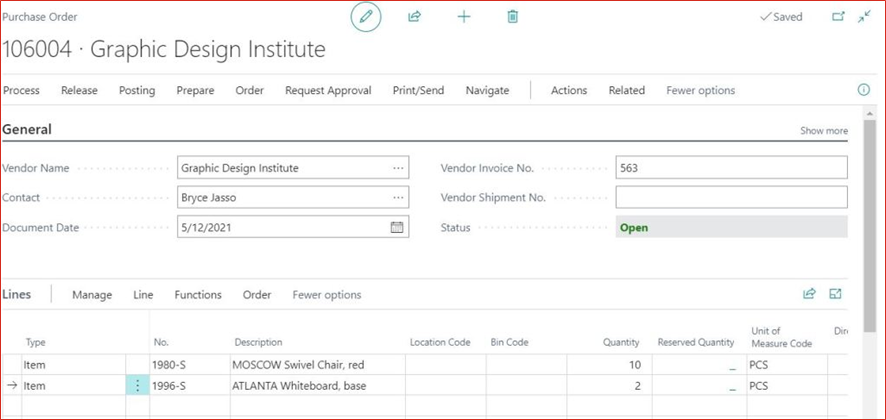
A purchase order is a staple in an organization’s financial documentation. It’s not only integral to expense tracking and budgeting, but also to help keep supply chain management on track. It documents a buyer’s intent to purchase goods or services from a company. It can include certain details of a transaction, including price and requested quantities. Once a company receives and accepts the terms of a purchase order, a sales order can be created based on purchase order details.
Purchase orders and sales orders are inherently interconnected. The key difference between the two is who generates the document and who receives it.
While a purchase order is generated by the buyer, a sales order is generated by the seller. A sales order specifies the details about the products or services ordered by the purchaser. Sales orders are vital to keeping track of your inventory. They allow you to keep track of what you have in stock, what’s on back order, and what you may need to purchase from your vendors. Sales orders also help you reduce the risk of material misstatement in your organization’s financial reporting.
With the basics covered, now we’ll walk you through how to use purchase order dates in Microsoft Dynamics 365 Business Central.
How to Use Purchase Order Dates in Business Central

There are several date fields on purchase order screens in Business Central, which can be confusing. However, if used correctly, you can use these dates to improve your purchase order processing. You also can measure your vendor performance more accurately.
Purchase order dates can be located on the Header only, Line only, or both the Header and Line. If the date exists on both the Header and Line, you should bring your attention to the dates on the Line. The lines determine your planning parameters.
If you try to change the date on the Header, Business Central will ask if you want to update the dates on the lines. Answering “yes” will update the dates on the lines. You can have different dates between the header and lines.
Purchase Header Dates
Let’s begin with Purchase Header dates.
General FastTab

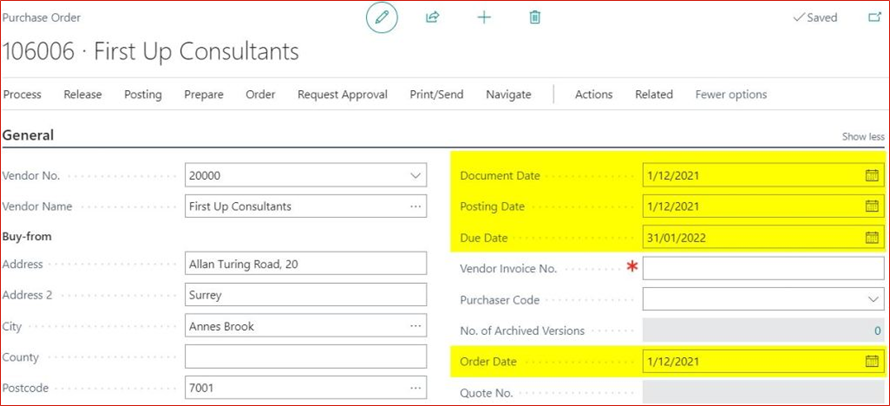
Document Date – Used to calculate invoice related fields, such as due date (for invoice payment and prepayment). The document date defaults to the date the document was created. When you manually fill in the document date, the due date will be updated automatically.
Posting Date – Used when posting the transaction to the ledgers. It’s used for receipt date, invoice date, return date, or credit date, depending on what you post. The posting date defaults to the date the document was created. The posting date also is used to calculate the exchange rate. When you manually fill in the posting date, the document date will be updated to match.
Order Date – The date you order the goods. This defaults to the date the document was created. It’s used to calculate price and discount. This date exists on both the Header and Line. The requested delivery date on the Header does not affect any fields. However, when you update the requested delivery date on the Header, you may get a warning that the order date needs to be reviewed and manually updated.
Due Date – The date when the invoice needs to be paid (invoice payment due date). The date is calculated from Document Date + Payment Terms. Changing the due date will not update the document date.
Invoice Details FastTab

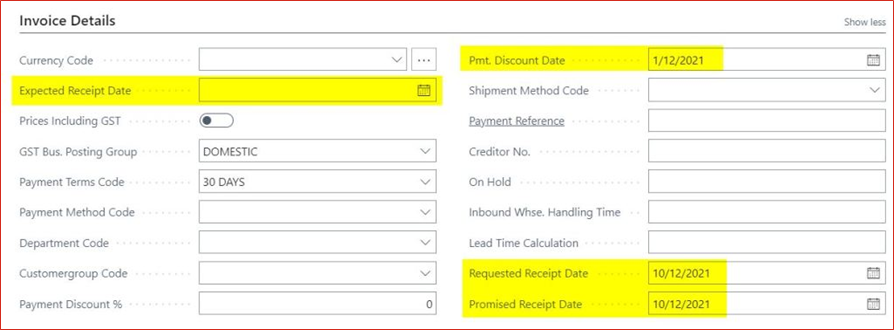
Expected Receipt Date – The date you expect the goods to arrive at your location. By default, it’s blank. This date exists on both the Header and Line. The expected receipt date on the Header does not affect any fields. When you update this field on the Header, the system will prompt you if you want to update the expected receipt date on the Line. Changing the expected receipt date on the Line will update the Planned Receipt Date and Order Date on the lines.
Pmt. Discount Date – Used to be eligible for payment discount if you do early payment. It’s calculated based on the Document Date + Payment Term Discount Date Calculation. If there’s no discount associated with the payment terms, this date will be equal to the document date.
Promised Receipt Date – The date promised by your vendor that you would receive the goods at your location. By default, the field is blank. This date exists on both the Header and Line. Entering a promised delivery date on the Header will lock the Requested Receipt Date on the Header. When you update this field on the Header, the system will prompt you if you want to update the promised receipt date on the Line. Changing the promised receipt date on the Line will lock the Requested Receipt Date and update the Planned Receipt Date on the lines.
Requested Receipt Date – The date you have requested for the goods to be delivered at your location. By default, the field is blank. This date exists on both the Header and Line. The requested receipt date on the Header does not affect any fields. When you update the field on the Header, the system will prompt you if you want to update the requested receipt date on the Line. Changing the requested receipt date on the Line will update the Order Date and Planned Receipt Date on the lines.

Prepayment Due Date – The date when the prepayment invoice needs to be paid (invoice prepayment due date). The date is calculated from Document Date + Prepayment Payment Terms. Changing the prepayment due date will not update the document date.
Prepayment Payment Discount Date – Used to be eligible for payment discount if you do early prepayment. It’s calculated based on the Document Date + Prepayment Term Discount Date Calculation. If there’s no discount associated with the prepayment terms, this date will be equal to the document date.
Purchase Line Dates
Now let’s look at Purchase Line dates in Business Central.
When the date exists on both the Header and Line, the date on the Line is the one being used by the system for planning (replenishment).

There are five dates on the Line (excluding the Fixed Asset related dates) – Order Date, Requested Receipt Date, Promised Receipt Date, Planned Receipt Date, and Expected Receipt Date. These dates are related to and calculated from each other. Changing one of these dates will cause the system to recalculate the other dates (which sometimes isn’t ideal depending on your warehouse process).
Order Date – The date you order the goods. When you update the order date, the system will update the Planned Receipt Date and Expected Receipt Date.
Promised Receipt Date – The date promised by your vendor that you would receive the goods at your location. By default, the field is blank. When you update it, the system will update Planned Receipt Date = Promised Delivery Date and will lock the Requested Receipt Date.
Requested Receipt Date – The date you have requested for the goods to be delivered at your location. Changing the requested receipt date will update the planned receipt date. If the field is blank, the system will update the Expected Receipt Date or Order Date on the Line to match the Header Expected Receipt Date or Order Date.
Planned Receipt Date – The date when you expect the goods to arrive at your warehouse. It’s calculated from Order Date + Lead Time.
Expected Receipt Date – The date when you expect the goods to be available at your warehouse. It’s calculated from Planned Receipt Date + Safety Lead Time + Inbound Warehouse Handling Time. For inventory planning, the expected receipt date can be treated like a required field.
Calculations to remember:
- Order Date = Requested Receipt Date – Lead Time
- Expected Receipt Date = Requested Receipt Date + Safety Lead Time + Inbound Warehouse Handling Time
- If the Requested Receipt Date is blank, replace Requested Receipt Date on the formula with Planned Receipt Date
Now that you know how to use purchase order dates in Business Central, how else can we assist? The Business Technology Solutions Team at Forvis Mazars is a Microsoft Dynamics Gold Partner and 2022 recipient of the Microsoft Inner Circle award. We provide analysis, design, implementation, upgrades, training, and support services for Business Central and other Microsoft Dynamics business applications. Use the Contact Us form below to get in touch.
